

My quest for Home-Baked Pizza
For the past few months, I've been on a quest to make really good pizza at home with a sourdough crust. I've been baking sourdough breads and other baked goods since 2017, but this spring, I kicked things up a notch when I began to understand that the tummy troubles that have plagued me since college might be related to carbohydrates called FOPMAPs.
I love food. I love to cook and bake, and I love to eat. When I first started have digestive woes over twenty years ago and I was told to go on an elimination diet to see what the problem was, I became deeply depressed. Life without wheat and dairy (among other things)--the two culprits the doctor suspected--frankly didn't seem worth living. I was living in a dorm, and though the dining hall was equipped to deal with allergies and food sensitivities, it wasn't easy to stick to an elimination diet. Basically, I was eating rice and applesauce and little else. And I didn't get better. In the years since, I've tried a high fiber diets and low reside diets, low carb diets and the good old fashioned BRAT (bananas, rice, applesauce, toast) diet. Nothing seemed to make a difference. I could go for months without any negative symptoms and then one day I'd developed a terrible stomachache and it would last for days, weeks, or months. Over time, I realized stress was definitely a factor, and I also learned that intermittent fasting helped. Then, last summer, I had an emergency appendectomy, and ever since, my stomach had been in a state of upheaval. So I did what I do when I'm feeling unwell. I consulted the internet to see if any new magic cures have come up since I last checked. And in my searching I discovered the Low FODMAP diet as a possible solution.
In short, FODMAPs are carbohydrates. Some of them are hard for some people to digest, perhaps because of enzyme deficiencies, and others are universally hard to digest. For people like me with sensitive stomachs, these carbohydrates can trigger extreme reactions in the gut and cause all sorts of unpleasant sensations. To follow a low FODMAP diet, you eliminate all FODMAPs for a few weeks and then gradually reintroduce to find your triggers. Even though past elimination diets have failed me, I was hopeful that this one would work. Some of the foods singled out as high FODMAP were the usual suspects: dairy and wheat. Others were things that previous diets had encouraged me to eat: Apples, bananas, garlic, onions, sweet potatoes, beans. The advice seemed sufficiently different to be worth a go.
I knew it would be hard to follow this diet, especially because my husband lives on a diet of bread, cookies, crackers, and cheese. But then he decided to take a month-long ski trip out west, and I saw my chance. While I was home alone, I could be super strict and see what happened. And what happened was I felt better. Within one week, I felt like a normal human again. No stomachaches waking me in the night. No cramps or pain. I felt so much better that I didn't feel at all deprived.
Slowly, I began to add foods back in, and as I did, the writing on the wall became very clear. The main culprits were wheat and certain fruits and vegetables, but mostly wheat. Taking enzyme supplements helped with the veggies, and the problem fruits were easy to avoid because I never liked them that much anyway.
As for bread and bready things, I had one great consolation: Sourdough bread is not high FODMAP, even if it is made of wheat.
When I read about this, I was skeptical. Apparently, the fermentation process of creating sourdough bread causes the carbohydrate in wheat to the rearrange into an easier to digest form. This sounded a little like alchemy to me, but I talked it over with some scientist friends and they assured me it made sense. So I got back to backing my sourdough, and, as long as I don't go nuts and eat a whole loaf of bread in a sitting, I feel just fine. Whereas if I eat a cupcake from a local bakery, I have three days of digestive distress, and migraines, too.
While my self-experimentations might not be the most scientific, I can't deny that my body reacts very differently to the sourdough breads I make and to other forms of wheat products. So, if I want pizza or bread, I have to make them myself. Fine by me.
While it is less fun to go to restaurants these days, my home-baked goodies have kept me satisfied and happy. Who could ask for more than that?
Unfortunately, my pizza making efforts haven't been as brilliant as I'd like.
After much experimentation to make "New York" style pizza with a thin, crispy-chewy crust, I have come to accept that without a pizza oven, I cannot replicate the texture of my favorite pizzeria style pies. I can make a tasty crust, but it will never have that delightful droop of a perfect slice AND be fully cooked. I can make a nice crispy crust pizza, but it just doesn't satisfy the way restaurant pizza does.
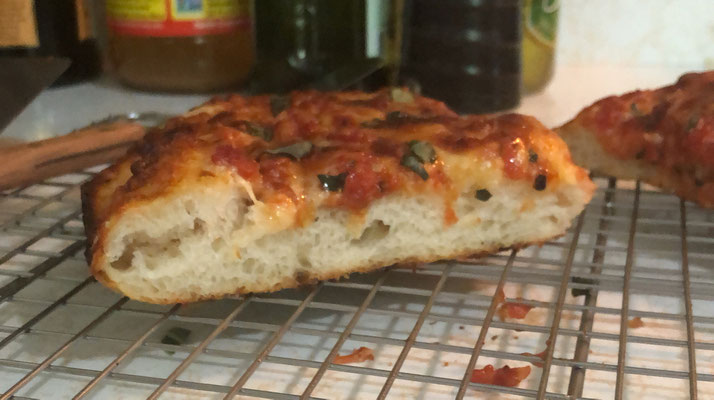
This week, I decided to go in a different direction entirely different direction, to abandon "New York" style pizza in favor of pan pizza.
And the results? OMG delicious. Ladies and gentlemen, we have a winner. It's light as air, full of flavor, and so easy to make. My husband said it was the best pizza in the entire city of Worcester, in any category. Take that, take out!
The Recipe
I adapted this recipe from King Arthur Flour's original recipe for Crispy Cheesy Pan Pizza.
You'll need to make the dough the day before (or a few days before) you plan to bake, so plan ahead.
For the dough:
- 140g fed sourdough starter
- 170g All Purpose Flour
- 3/4 tsp salt
- 100 g warm water
- 13 g EVOO
To prepare the dough:
- Gently whisk the started and water until the starter is broken up and somewhat dissolved. Add the flour and EVOO, mix until a shaggy dough forms. Cover and set aside for 30 minutes.
- Add the salt and fold the dough in the bowl 7 or 8 times. When the dough begins to tear instead of stretch, stop. Cover, set aside for 30 minutes. Then repeat the folds. Continue this process, folding every 30 minutes, for a total of 6 sets of folds. Then let the dough continue to rise at warm room temperature for about three more hours until it is light and airy and has risen significantly.
- Lightly grease a medium bowl with more olive oil, place dough in the bowl, turning to coat, cover and refrigerate 12 to 72 hours.
- Two to three hours before you plan to bake, take the dough out of the fridge. Grease a 10-inch cast iron skillet with 1 1/2 T EVOO. Place the dough in the skillet, turn once to coat. Gently stretch the dough dimpling it with your fingers, to fill the plan. If it tears or resists, let it rest fifteen minutes and try again. The dough should reach the walls of the skillet on all sides. Leave it rise in a warm spot until it is pillowy.
For the toppings:
- 1 1/2 cups shredded mozzarella
- 1/3 to 1/2 c pizza sauce
- Chopped fresh basil
- Anything else you like
To bake the pizza:
- Place oven rack on lower-middle position. Preheat to 450.
- When oven is preheated, sprinkle one cup of cheese all over the dough, all the way to the edges of the pan, leaving no "crust." Dollop sauce on top of cheese. Sprinkle remaining cheese on top of sauce.
- Bake about 20 minutes. Gently lift the dough from the pan and check the bottom to see that it is golden brown. If not, bake 2 to 4 minutes longer.
- Let cool in the pan for a few minutes and then gently slide the pizza onto a wire rack. Sprinkle with basil. Serve (King Arthur recommends cutting it with kitchen shears. I tried it! It was a good suggestion!)
My pizza sauce recipe:
- 1 can diced, fire roasted tomatoes
- 2 T. tomato paste
- 1 T. butter
- 1/2 an onion minced
- 2 garlic cloves minced
- pinch of red pepper flake
- 1/2 tsp dried oregano
- Splash of balsamic vinegar
- Salt and pepper to taste
- Cook the onion in butter until translucent. Add the garlic, cook 30 seconds. Add the tomato paste, red pepper flakes, oregano, some salt and pepper and brown lightly. Stir in the canned tomatoes. Cook ten minutes or so until the flavors have melded. Off heat, add a splash of balsamic vinegar.
- Puree lightly (I use an immersion blender) to the desired texture (I like my to still be a bit chunky).
Write a comment